Feeds:
Posts
Comments

Archive for the ‘Amigurumi’ Category

Hi everyone! It’s Cindy here to tell you about the set of watermelon themed baby items I crocheted for the newest member of our family, Amélia Grace Machado born June 7th. The new mom is my niece, Maggie, and is a big fan of watermelon themed things.

2241 - Watermelon Baby Gifts - lr

Watermelon themed baby gifts

I knew Maggie liked watermelon motifs, so I searched long and hard to find a blanket that I liked. I finally found a corner-to-corner (C2C) pattern on the Repeat Crafter Me blog.

I had never done a C2C project before but found some helpful videos on how to do the colorwork. Each block was worked separately and then sewn together. I appliqued the seeds on both sides of each block before sewing the blanket together, so the blanket is the same front and back.

I crocheted a border of single crochet stitches using three rounds of white, three rounds of pink, one round of green, and then one more round of green using the reverse single crochet stitch.

For the baby booties I used my tried-and-true pattern from the June 2010 Crochet World magazine that I’ve made for all the babies in our family. I only had to modify it using color changes and then I added some embroidered seeds to the toes.

2235 - Watermelon hat - lr

Watermelon hat

The hat was another pattern from Repeat Crafter Me. Instead of using beads for the seeds, which I didn’t think was safe for a baby, I again appliqued some seeds to the hat.

The final baby gift was a rattle in the shape of a slice of watermelon. This pattern came from PinkyPinkyBlueAU on Etsy. I used a piece of foam for the filling that I cut a slit in and inserted a small plastic case with some washers inside to make it rattle. 

2248 - Watermelon Blanket - lr

Watermelon blanket

I enjoyed working on this set of watermelon themed gifts for the newest member of our family. The yarn used for all these items was Caron Simply Soft in Blackberry, Pistachio, White and Black. I love using this yarn for baby items since it is so soft and is easily washable. The new mom and dad were gracious enough to wait to open their gifts until we could do a Zoom meeting so I could “be there” when they opened the gifts. Maggie loved them and Tiago said he thought Maggie would use the blanket more than the baby because she loved it so much.

I hope you enjoyed seeing my work as much as I enjoyed making them.

I’m joining the The Loop Scoop Yarny Link Party (formerly known as Hookin’ on Hump Day). You should stop by to see some of the other projects people have posted.

Read Full Post »

Hi everyone! It’s Cindy here to tell you about the second half of my Jimmy Beans Wool Craftvent Calendar advent calendar creations. Let’s see what was in the rest of the boxes.

Striped Scarf
Madelinetosh Impression Yarn
Colors: Colors: Antler (white) & Malmo (dark green)

I would have to say that working with the Impression yarn wasn’t my favorite, especially with the darker colors. The pattern didn’t call for the border of dark yarn on the sides of the scarf but since the yarn was carried up the side, I didn’t like the look, so I covered it up with a single crochet around the entire scarf. It was finished off with fringe of alternating both colors of yarn.

Star Hat
Madelinetosh Tosh Merino Light Yarn
Colors: Carousel Horse (pink multi) & Tart (red)

The written pattern for the star hat called for another star applique like the ones for the sweater and mittens I posted about previously. I wasn’t happy with how those looked so I used the chart for the knitted pattern and did my hat in the waistcoat stitch to mimic a knitted stitch. I also used a ribbed brim instead of what the pattern called for. In other words, I winged it!

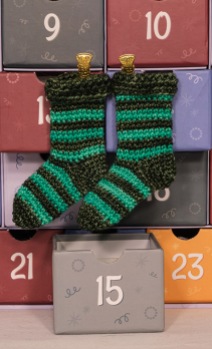
Striped Socks
Madelinetosh Twist Light Yarn
Colors: Malmo (dark green) & Sorry, Not Sorry (light green)

These socks were crocheted the same as the previous ones except you changed color every two rows. They were very easy to make.

Day sixteen contained 100% Aromatic Red Cedar that is harvested from renewable forests. It grows quickly and is a reliable and sustainable resource. I will be storing my Craftvent creations with these to deter moths and other pests.

Colorblock Raglan Sweater
Madelinetosh Impression Yarn
Colors: Colors: Carousel Horse (pink multi) & Patriarch (bright red)

The design of this sweater was fairly simple to make except that it was done with my least favorite yarn in the box.

Colorblock Hat
Madelinetosh Twist Light Yarn
Colors: Tern (dark grey) & Tart (red)

This was the simplest hat to make. I switched to the ribbed brim I did on the previous hats and added one of the pom poms that came in the day four box.

Day nineteen contained this cute tape measure. The gnomes are featured on the front of the box too.

Yoke Sweater
Madelinetosh Tosh Merino Light (TML) + Tweed Yarn
Colors: Malmo (dark green) & Antler (white)

This was another color work sweater. It was easy to follow the chart and I love the look of the yoke.

Striped Hat
Madelinetosh Twist Light Yarn
Colors: Tern (dark grey) & Tart (red)

Another easy hat to make. I switched to the ribbed brim I did on the previous hats and added one of the pom poms that came in the day four box.

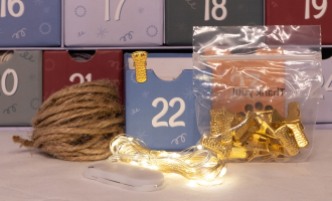
The day twenty-two box was another break from crocheting with some accessories to help hang all the creations up and light them up.

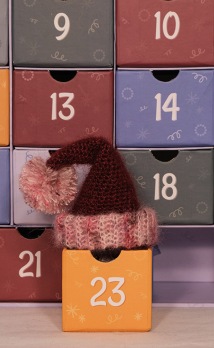
Santa Hat
Madelinetosh Impression Yarn
Colors: Colors: Carousel Horse (pink multi) & Tart (red)

This was the final project of the box and was a bit of a challenge to start. The pattern started at the smallest part and with the fuzzy lace weight yarn it was difficult to see to start. I had to restart because I was having a difficult time seeing the stitches. Since that yarn is so fuzzy you can’t rip it back like most normal yarns, I scrapped it and was able to make it work. I added a self-made pom pom with the pink yarn.

The final box contained a sample of Eucalan Lanolin Enriched Laundry Concentrate and a tapestry needle.

Mini Millie and Walter had some fun trying on a few of the creations.

Here is a look at them all hung up on the twine with the fairy lights. I’m not sure how I will display them for next Christmas. They are a bit too big to fit on my tree but there might be another crocheted creation or some other sort of crafty creation to display them.

2079 - Craftvent box - Tiny Trimmings on String with Lights - lr

Jimmy Beans Craftvent 2022

I know that this has been a long post so thank you if you made it this far. It’s been fun working on all these little projects and I hope you’ve enjoyed seeing them.

I’m joining the The Loop Scoop Yarny Link Party (formerly known as Hookin’ on Hump Day). You should stop by to see some of the other projects people have posted.

Read Full Post »

Hi everyone! It’s Cindy here to tell you about the first few days of my Craftvent advent calendar. As I showed you in my previous post the first box contained the tools needed to complete the projects. Let’s see what was in some of the next boxes.

Stranded Hat
Madelinetosh Tosh Merino Light (TML) + Tweed Yarn
Colors: Tart (red) & Tern (grey)

The projects started off with one of the more challenging patterns, a colorwork hat. Since I had done colorwork on some previous projects I wasn’t too intimidated by this one. It was worked from the top down and the pattern suggested using the waistcoat stitch that simulates a knit look. I changed the brim of the hat to a ribbed one instead of what the pattern called for.

Color Block Mittens
Madelinetosh Tosh Merino Light Yarn
Colors: Tart (red) & Antler (white)

The next pattern was a simple pair of mittens. I had never made mittens and didn’t know how the thumb was formed, but it was easy to understand the instructions.

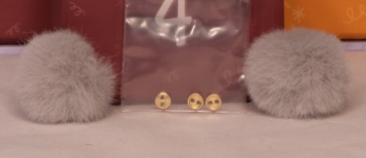
The day four box contained a couple of cute pom poms and some tiny gold buttons. The instructions in the box said that there are four hat patterns in this box so we get to decide which ones we might want to put the pom poms on. The buttons are supposed to be a decoration for an upcoming sweater.

Color Block Scarf
Madelinetosh Impression Yarn
Colors: Tart (red) & Carousel Horse (pink multi)

The yarn for day five is a lace-weight yarn that is 70% mohair and 30% silk. It was a bit difficult to work with, but the pattern was a simple scarf and worked up quickly.

Day six contained a set of stitch markers with leather adornments. I like having ones that have right side (RS) and wrong side (WS) designations. They will come in handy.

Color Block Socks
Madelinetosh Twist Light Yarn
Colors: Malmo (dark green) & Sorry, Not Sorry (light green)

The day seven socks were easy to make and worked up quickly.

Striped Raglan Sweater
Madelinetosh Tosh Merino Light Yarn
Colors: Malmo (dark green) & Antler (white)

The striped raglan sweater was very easy to make. I’m glad I made some raglan style sweaters for myself in the past couple of years.

Craftvent box - Day 9 - Candy

Birnn Chocolates of Vermont

Day nine was a nice break from hooking with a little chocolate break from Birnn Chocolates of Vermont.

Star Sweater
Madelinetosh Twist Light Yarn
Colors: Carousel Horse (pink multi) & Patriarch (bright red)

There were some missing parts to the instructions for this sweater but after referring to the knit version of the pattern I was able to figure out how to complete it. The star on the front is an applique. I’m just a bit disappointed that the star wasn’t crocheted in like it is in the knit version.

Star Mittens
Madelinetosh Tosh Merino Light (TML) + Tweed Yarn
Colors: Antler (white) & Tart (red)

These mittens were similar to the previous mittens with the added star applique. I also wish this pattern was for the star to be crocheted in and not as an applique. 

della Q Accessories – Scissor Pocket w/ scissors

The day twelve box was another break from crocheting with the della Q Scissor Pocket and a pair of scissors.

Mini Millie and Walter had some fun trying on a few of the creations.

I know that this has been a long post so thank you if you made it this far. It’s been fun working on all these little projects and I hope you’ve enjoyed seeing them.

I’m joining the The Loop Scoop Yarny Link Party (formerly known as Hookin’ on Hump Day). You should stop by to see some of the other projects people have posted.

Read Full Post »

Hi everyone! It’s Cindy here. Today I want to show you what has been keeping my crochet hook busy the past few days.

1569 - Craftvent box - cover - lr

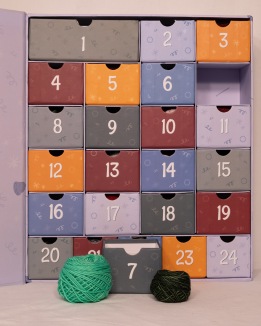
You’ve probably heard of advent calendars where you open a little door or box each day in the month of December to count down the days until Christmas. Usually, the calendars contain candy or if you get one for your pet it might have toys or treats. This calendar from Jimmy Beans Wool is for knitters or crocheters and contains all you need to create cute holiday decorations. The kits were available in three colorways. I chose the “Home for the Holidays” colorway which is mostly greens and reds with some white and grey mixed in. At the time of writing this post there were only a handful of kits available in the “A December to Remember” colorway. 

1571 - Craftvent box - Mini Millie Walter - peek inside - lr

Let’s take a peek inside.
I see lots of yarn that mom will love.

You aren’t supposed to peek until the proper day of the month, but Mini Millie & Walter couldn’t help themselves.

1575 - Craftvent box - Mini Millie Walter - look in drawers - lr

Look at all this soft yarn.
Mom’s going to like these colors.

The mini pups invited their friends, the boys from South Park to sneak some peaks in the boxes too.

1576 - Craftvent box - South Park Boys - look in drawers - lr

Cartman: I think I smell some candy in here somewhere!
Kyle: So far, I’ve only seen yarn.

Those boys are known for being naughty!

1578 - Craftvent box - South Park Boys - pull out yarn - lr

Stan: Look at the yarn we found!
Kyle: You’re not supposed to take out the yarn before the proper day!

Mini Millie & Walter pitched in to help Cartman get to the top with the rest of the boys.

1584 - Craftvent box - South Park Boys - Mini Millie Walter - help Cartman to top - lr

Cartman: Hold that line tight so I can get to the top.

My crocheted characters had fun exploring the Craftvent box. So far, I’ve been able to keep up with the projects since there are a few boxes mixed in that don’t have any yarn that gives you a day off (or a day to catch up).

1655 - Craftvent box - Day 1 - Needles and Hook

Day 1: 3.25mm crochet hook and 2.75mm Double Pointed Needles

The first day contained the hook and needles that you need to work on all the projects. There was also a slip of paper with instructions on how to download the patterns.

Later this week, I’ll show you some of the projects I’ve created so far. They are all so cute!

Read Full Post »

The Christmas Gingerbread Train!

Hi everyone! It’s Cindy here to tell you about the adorable, crocheted gingerbread train I created to add to our holiday decorations. 

1612 - Christmas Gingerbread Train on Tracks - lr

Christmas Gingerbread Train

The pattern for this detailed amigurumi was created by the designer from Toyfox Store on Etsy. The fifty-eight-page pattern is incredibly detailed with many pictures and even includes a few links to videos you can watch to help you complete this project. The yarn used is Scheepjes Catona (50g) which is great for this type of work. I used two skeins each of Snow White (106) and Caramel (506) and less than a skein each of Scarlet (192), Kiwi (205), and Chocolate (507). Since you can’t tell by the picture how big the train is I will give you some dimensions as we look at each piece. All coupled together the train is about 14 ½ inches (37 cm) long.

1599 - Christmas Gingerbread Train - Lead Car with Candy - lr

Lead Car with Christmas Sweets

I’ve had this project on my hook for almost 9 months with a few breaks for other projects in between. I started with what I determined would be the simplest part, the Lead Car and the Christmas Sweets. This car measures 3 ¾ inches (9.5 cm) long by 2 ¾ inches (7 cm) high by 2 ½ inches (6.4 cm) inches wide. Each of the candies required a slightly different technique for the colorwork. Charlie did his usual handyman job of supplying me with the sticks for the lollipops. The trick to getting those lollipops to stand up in the car is a small piece of florist foam in the bottom of the car.

1602 - Christmas Gingerbread Train - Cupcake Caboose - lr

Cupcake Caboose

The Cupcake Caboose used some more new techniques and stitches to me such as the “split single crochet” (also known as the waistcoat stitch) that was used on the striped lower part of the cupcake. A crocheter can see that this stitch gives you the look of knitting. The spirals of frosting were done by working a single crochet in the front loops of the previous round and then working another single crochet into the back loops of the same base stitches. The first time I made the top of the cupcake I did it wrong and when I realized my mistake, I ripped it out and redid the frosting. This car is 3 ¾ inches (9.5 cm) long by 5 inches (12.7 cm) high (to the top of the cherry) by 2 ½ inches (6.4 cm) inches wide. I just love all the minute details that went into this car.

1594 - Christmas Gingerbread Train - Engine - side view - lr

Gingerbread Train Engine

The pattern is written with each step for each car separately, but I did some of the parts in an assembly line fashion. For instance, all the wheels are identical so instead of doing the first four and then finishing one car I did all of them together, so I didn’t have to remember how to make them each time.

1598 - Christmas Gingerbread Train - Engine - front view - lr

Front view of Engine

To create the various shapes and make them rigid, cardboard was used either in a sandwich of crocheted pieces (the wheels) or in the case of the engine the cardboard is glued to the inside of the walls and roof before it is sewn closed. Other parts of the train were stuffed with polyfil and with the lead car and the cow catcher on the front of the engine, I used stiffener to make them rigid.

1650 - Christmas Gingerbread Train - back door - lr

Back of the Engine

There are a lot of little parts that went into making the engine, so I left that car for the end. I just love all the little details of the snow-covered roof with icicles hanging off, the candy decorations and the way the stitching makes it look like frosting on the roof, and the cute little door and windows on the sides and back. Not to mention the boiler and all its adornments on the front.

Christmas-Gingerbread-Train---Spinning

A 360 view of the Engine

This engine is 5 ½ inches (14 cm) long by 5 inches (12.7 cm) high by 2 ½ inches (6.4 cm) inches wide. Overall, I’m very happy with how this train turned out. For displaying it I created a machine embroidered set of train tracks on white polka dot fabric so it looks like it’s flying through the snow.

1612 - Christmas Gingerbread Train on Tracks - lr

Christmas Gingerbread Train

If you are a medium to experienced crocheter I would recommend this pattern. The instructions are very detailed with lots of pictures to help you and is extremely easy to follow.

I’m joining the The Loop Scoop Yarny Link Party (formerly known as Hookin’ on Hump Day). You should stop by to see some of the other projects people have posted.

Read Full Post »

Hi everyone it’s Cindy here. Today I’m joining the Hookin on Hump Day blog hop to tell you about my most recent Feel Better Friends (FBF) doll that I made.

Emmalynn

Emmalynn is a 9 year old girl with epilepsy and some other health issues. She recently received a VNS device that helps control seizures.

Emmalynn is pretty in pink

Emmalynn’s mother said that her favorite color is pink and that she is in and out of the hospital a lot. She hopes that a doll would be a great comfort for Emmalynn when she is having testing or when she is admitted to the hospital.

Doll and accessories for Emmalynn

I noticed in the pictures that were sent to me that Emmalynn was often accompanied by a stuffed Teddy bear so I decided her doll needed one too.

A perfect bear for a doll

I found a cute little Teddy bear pattern from AmigurumiToGo.com. Emmalynn’s bear has lighter colored paws and nose so I made that adaptation to the pattern. I love the way the bear turned out and think he is the perfect size for the doll.

Every doll needs a bear for a sidekick.

To go along with her fancy dress I made a pair of “Mary Jane” shoes for the doll.

Cute little Mary Jane’s for the doll with her pink socks.

The hair for this doll was made using Knit Picks Shine sport weight yarn that was first hooked into the scalp. I then styled it as close to Emmalynn’s hair as possible.

The last thing I did was to try and simulate this doll having a VNS device. I started with a small piece of wood that I covered with muslin and then sewed into the chest of the doll.

I also added scars where the surgery left scars on Emmalynn.

VNS scars on the doll

A VNS device is sort of like a pacemaker for the brain. The wood piece that is in the doll doesn’t really stand out but it can be felt just below the scar on the chest.

Emmalynn loves her doll

According to Emmalynn’s mom, “My daughter Emmalynn loves her Feel Better Friend! Thank you so much! You did an amazing job! And to make her teddy also. You made my little girl so happy!!!!”

Making Feel Better Friends dolls has been a great way to use my crochet skills for charity work. Right now FBF is in need of more volunteers to make dolls. We are an all volunteer organization and recently the number of requests for the United States reached a point that the leaders have had to shut down requests for the USA so we can catch up. If you would like to help please click here to learn how to become a volunteer.

HOHD-Badge

You should stop by the Hookin on Hump Day blog hop to see some of the other projects people have posted.

Read Full Post »

Warning to Frankie & Ernie…you might want to avert your eyes and also not let your mom see this post.

Hi everyone it’s Cindy here. Today I’m joining the Hookin on Hump Day blog hop to show you what I’ve been working on since making all that baby stuff. While perusing one of my favorite catalogs, Mary Maxim, I saw the cutest kit that would be a great addition to our winter decor. I waited for a “free shipping” sale and ordered the kits. Without further ado I’m pleased to introduce you to the Snowman Family!

I had the dad done just after Christmas and finished the rest of the family a few weeks ago.

Snow Dad

The kits (you can buy mom and dad separately and the kids as one kit) come with patterns that were all very easy to follow and have everything you need except the stuffing.

There are a couple of things I did differently from the pattern. The first was the way the nose was made. It is made of felt and the instructions tell you to hot glue it into the cone shape and then glue it to the face. That seemed like a messy way to do it so I sewed the cone shape by hand and then sewed the cone to the face. I had just the right color orange thread and you can hardly see any stitching.

Snow Dad’s Snowflake Garland

The pattern also called for the sequins to be glued onto the snowflake garland but again I didn’t want any messy gobs of glue so I sewed them on. With grey thread it is barely visible.

Snow Mom

The Snow Mom’s sweater was fun to work on as it required some different shaping than I had ever done before.

The sweater had some lovely details with the trim around the edges, the little pockets, and the snowflake buttons.

Snow Girl

The Snow Girl has similar trim details around the neck of her poncho as the mom’s sweater and they both have ear muffs that are made from pompoms and a pipe cleaner.

Snow Boy

The Snow Boy’s colors really tie the family together. I love the little pompom snowball he is holding.

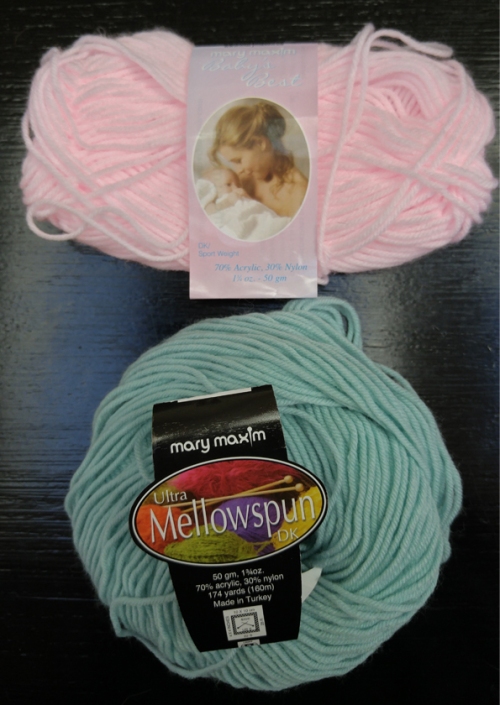
Caron Simply Soft (White), Mary Maxim Ultra Mellowspun DK (Dark Blue), Lion Brand Vanna’s Glamour (Diamond)

All of the bodies were made from the Caron Simply Soft yarn. The colored fabrics were made by holding one colored yarn together with the Vanna’s Glamour Diamond yarn.

Mary Maxim Baby’s Best (Pink)
Mary Maxim Ultra Mellowspun DK (Robins Egg)

The Vanna’s Glamour yarn is a combination of white with a metallic strand so it makes the colors twinkle.

Snow Dad before the rest of the family was finished.

During the winter the Snow Family will reside on the buffet in our foyer. Frankie and Ernie you can rest easy knowing that they have been put away for the season.

Hey mom! Are you sure I can’t play with the Snow Dad for just a little while?

I would highly recommend these kits to anyone and I hope you enjoyed meeting our Snow Family.

HOHD-Badge

Read Full Post »

Hi everyone it’s Cindy here. Today I’m joining the Hookin on Hump Day blog hop to finish showing you the things I crocheted for my grandnephew Henry Charles. I previously showed you the baby rattles, and more recently the hats and booties I made. This week I am showing you the circular baby afghan I made to complete the set.

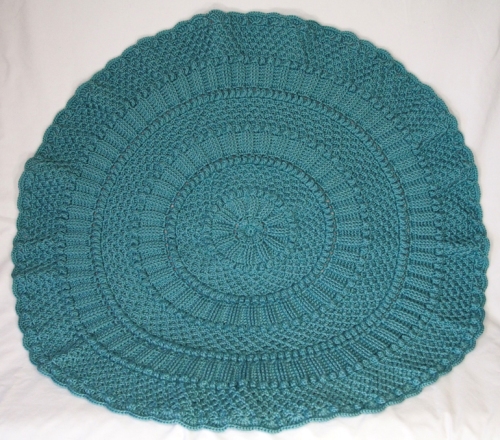
Lille Matelassè Circular Baby Afghan

Lille Matelassè Circular Baby Afghan

The design is from a collection from Priscilla’s Crochet. She can be found on her website or on Ravelry. This afghan is from her Matelassè collection. I bet you are wondering what “Matelassè” is so here is the designers explanation.

If you’re not familiar with matelassé (pronunciation: må`lå`sã´) fabric, here is one definition:

Definition of MATELASSÉ: a double cloth of cotton or rayon or other fibers woven on a jacquard loom and used esp. for clothing, upholstery, and bedspreads and marked by raised floral or geometric designs with a
puckered or quilted appearance achieved by the interlacing of threads in the weaving or the contracting of threads in the finishing.

Courtesy Miriam Webster Dictionary

My intention while creating these designs was to imitate the feel of beautiful matelassé fabric and to translate that imitation into crochet. I hope you find the resulting patterns satisfying.

Center detail

Center detail

I picked this afghan because I liked the texture and thought that might be interesting for little hands to explore. I also like to challenge myself and had purchased the matelassé collection initially to make a different afghan. This afghan finished at about 36″ in diameter which was just to gauge. I again used the Bernat Satin yarn and this is the “Sage” color.

Edge detail

Edge detail

I had explored the designers Ravelry page before I started this project and was glad I did. It’s difficult to see from the pictures but the area where the diamond shape is (seen above in the outer ring – before the scallop edge) is actually a series of chains worked in front of double and half double crochet stitches (US terms). Sorry to get all crochet geeky on some of you. It was good to look at some of the other projects from this same pattern on Ravelry before starting my own.

Henry Charles approves

Henry Charles approves

As you can see I think Henry approves! He is such a cutie and a real joy to his parents and grandparents. My sister is lucky to live so close and has been a real help to her daughter and son-in-law.

I have an update on the hats I made for Henry. Either I needed to use a larger hook, larger yarn or he has a slightly larger head than most babies but the hats I made were too tight for him. Well what is a good auntie to do but make a couple more.

New larger hat fits well

New larger hat fits well

I whipped up a couple more hats using a larger hook and in a larger size and the new ones fit. The above hat is the same pattern as one of the previous ones but in the larger size.

New two color hat for Henry

New two color hat for Henry

This hat is from the “Cuddle Bug Bunting Set” in the December 2012 Crochet World magazine. The pattern doesn’t call for two color yarns but I thought a solid color would look too boring. I also modified the pattern on this one to be larger than the pattern in the magazine. This one is made a bit longer so you can roll the brim of the hat up.

I hope you enjoyed seeing the baby afghan and new hats I made for Henry Charles.

HOHD-Badge

Read Full Post »

Older Posts »