Feeds:
Posts
Comments

Archive for the ‘Art quilts’ Category

The Perinton Quilt Guild, which is the smaller of the two clubs I belong to, wrapped up our season with our last meeting on June 4th.  About a month ago we had our bi-annual quilt show and it was a great success! This year the show was held in the gymnasium at the Perinton Recreation Center. Except for it being a bit chilly for those of us that were there for extended periods it was a great location for the show.

View of the show from walking track above gym

The show was a great success with over 300 quilts made from members of our guild hanging. We had more visitors than previous shows and were very pleased with the reception we received from the town. Many people visited the show because they were already at the recreation center for another activity.

You can see most of the show from this view

I was responsible for signing up vendors for the show and they were all pleased with the turn out as well.

Handbags and other small items

In addition to the quilts there was also a display of some smaller items such as handbags and pillows.

Garage sale tables

The guild members also donated sewing and craft items for garage sale tables and we made a bundle of money from the sales. The show was not professionally judged, but rather was judged by popular vote from the visiting public.  I had seven quilts hanging in the show.  Three lap quilts that you can see below and four wall hangings.

Here are my lap quilts

Two of my wall hanging quilts were winners in this show.  My Lily Pond quilt won best small wall hanging and my Autumn Leaves quilt won second place in the large wall hanging category.

There were also a few special activities taking place during the show.

Last Minute Sales of Raffle Quilt Tickets

Tickets were sold for our raffle quilts and the winning ticket was drawn at the end of the show. The other special event was the unveiling of the Perinton Bicentennial Quilt the guild made for the town.

Perinton Bicentennial Quilt

You might remember when I previously blogged about the two blocks I made for the quilt. The church block is in the upper left and the Powder Mills Park block is in the lower right.  I am so pleased with how beautiful this quilt turned out.  All the ladies that participated did magnificent jobs, from the organizers to the quilt block makers and finally to the quilter that added the finishing touches.  If you click on the image you can see a larger view.  The border around the outside of the quilt has the names of local parks quilted in script writing.

Gail Mazur presents quilt to town leaders

About two weeks after the quilt show the guild officially presented the quilt to the town.  Gail Mazur was the coordinator of the quilt and she gave a small speech before the town supervisor helped to reveal the quilt in its display case.

Guild Members with Supervisor Jim Smith

Some of the ladies that worked on the quilt were able to make it to the presentation and posed in front of the quilt.

Some of us pointing to our blocks

Here are a few of us (that’s me on the left) pointing to the blocks we made. My blocks are so far apart I had difficulty pointing to them and looking at the camera at the same time.

The quilt guild season is now over until September.  I really enjoy both of the groups I belong to and will miss meeting up with all of these ladies until then. I hope you enjoyed checking out our quilt show and the beautiful Perinton Bicentennial quilt.

Read Full Post »

Amy's Creative Side

I thought I would throw my hat into the ring at the last-minute for this springs Bloggers’ Quilt Festival hosted by  Amy’s Creative Side.  I wasn’t sure which quilt I would enter, but decided on my Lily Pond quilt since I haven’t done a blog post about it previously.

Lily Pond

This quilt is a small wall hanging that is about 28″ x 20″ and the pattern is from Ruth B. McDowell’s Piecing Workshop book. When I first received this book my husband, who I like to call my “Chief Creative Consultant”, saw the quilt in the book and said that I had to make it for our house. I agreed, but I wasn’t promising exactly when.

About a year ago I was let go from my job and needed something to fill my time. We also were having a couple of bathroom make overs done so that meant many hours spent sequestered in a couple of rooms on the first floor of our house while the work was done upstairs. I decided that this would be a good project to occupy my time while the work was done.

It may be a small quilt, but there are about 87 million pieces in it.  Okay that is a bit of an exaggeration, but there are a lot of pieces and some of them were very small.  My Chief Creative Consultant was very helpful with picking out fabrics and helping decide where to put which fabrics. Ruth McDowell uses a technique for piecing where you use freezer paper to create all the template pieces, mark them so you know where they go and how to match them up with the pieces next to them, and then iron the freezer paper pieces to the fabric and cut them out with a 1/4 inch seam allowance added.

The pattern is actually fairly easy to piece together, but you have to keep your concentration while you are working on it. I had all the pieces cut out with the freezer paper on them and pinned to my design wall. It is pieced together in sections that are marked on the pattern.  It was great fun to watch the quilt grow as the sections were pieced together.

For the quilting I used a variety of thread colors and design depending on which area I was quilting.  I actually quilted the water area twice as I over did the density of the stitching the first time.  I had to painstakingly pull out all of the stitches in this area and redid it and I’m glad I did. I had some fun with the quilting too and added a couple of frogs on the lily pads.

You can click on the images to see the details.

I like to finish off my quilts with a machine embroidered label.


My husband loves the way the quilt turned out and it is prominently displayed in the busiest room in the house, our family room.  On top of that I also entered this quilt in the Perinton Quilt Guild show a couple of weeks ago and by popular vote it won first place in the small wall hanging category!

I hope you like my entry for the Bloggers’ Quilt Festival. You can hop over to Amy’s Creative Side to see all the other quilts entered in the show.

Read Full Post »

I recently discovered a new quilting blog and they are having a huge give away that I could not resist.  Even though I just looked and there are over 400 entries I figured why not up my chances just a bit by doing a post about it.  Thanks to Very Berry Handmade all I have to do is do a post about what I hope to accomplish this year in sewing and I get a second entry in the drawing.

Well many of my followers already know that I will soon have a wonderful quilt to work on, the memory quilt for the Fearless Five and I am not starting anything big until that is completed.

Dragonfly Summer Quilt before basting

In addition to that I have a king sized quilt top that is basted and just waiting to be quilted.  At first I thought I might take this to a local quilt shop that has longarm quilting machines you can rent, but since I plan on doing quite a bit of custom quilting and not just do an overall quilt motif it would be too big a project for that.  After reading some of Leah Day’s posts about how she uses her domestic machine to quilt everything I decided I would give it a go. My friends at the Genesee Valley Quilt Club helped me baste it in November so I hope to start quilting this soon.

Quilt basting on a frame

Some of my other sewing goals for this coming year are to make more bags.  I would like to try my hand at selling on Etsy or in local shops.  There will be a variety of items from clutches, totes and purses as well as accessories for knitters like the project bags and needle roll I made for my sister.

The only other thing I have on my agenda for this year is to work on an applique quilt I have a years (12 months) worth of kits for.  It is a beautiful quilt with baskets of flowers and I can’t wait to start now that I have gotten my feet wet with applique.

Those of us that are blogging about this give away get to choose our preferred prize and I think the fabrics in the Fat quarter bundle (10 FQ) from Erin McMorris’s Summersault are delish although I would be more than happy to win any of the prizes.

Wish me luck as I tackle these projects in the coming year.

Read Full Post »

Autumn Leaves

I am happy to report that I have completed the art quilt I started during a class I took starting in January this year at Patricias’ Fabric House. You can read about how it all started by scrolling down towards the bottom of this post. The class taught us how to piece a design using freezer paper. The design used for the class was created by Pat Pauly using a technique developed by Ruth McDowell. I had finished piecing the four 2′ x 2′ blocks of the same leaf design and pieced them into a large 4′ x 4′ quilt top by mid February, but since I hadn’t been quilting for very long I wanted to wait until I had more experience before actually quilting it.

Completed Big Leaf Block

Completed Big Leaf Block

A few weeks ago I finally basted the quilt top. I used 505 spray baste and would highly recommend it. It is nice to be able to quilt without having to stop and remove safety pins every few inches. If you do a careful job of securing the backing to your work surface so it is smoothly stretched out, carefully apply each layer (batting and then quilt top), and smooth each layer out as you go you should have no problem with shifting layers while you quilt.

Basted Big Leaf Quilt

Since this piece is an art quilt I didn’t want to just do an overall quilting on it. I used four different colors of variegated thread and quilted a different pattern in the different colors. In the red and orange areas I quilted in long skinny rectangles going the length of each section of the leaf part of the design while leaving the “veins” of the leaves unquilted. In the green area I wanted the quilting to represent grass so I quilted that area in long skinny triangles. The blue is done with stipple quilting. Not a very complicated design overall, but since the plan was to hang the finished quilt in our family room the quilting needed to be well done.

A few months ago I ordered some YLI machine quilting thread (40wt.) in the varieties of colors I wanted for this quilt and I planned on using a solid green thread for the back of the quilt since the back is just green with a vine design on it. Before starting I prepared my machine by cleaning it and putting in a fresh needle. I set up my Free Motion Assistant and got started.

This is where the frustration and growling from me began. I didn’t realize that I was growling my frustration until my husband mentioned it after I had completed the quilt (he also asked if this really was a relaxing hobby 😛 ). I could not get the tension set so that you didn’t see the top thread coming through the back and even with the tension set to zero the top thread was still shredding. I did some research online to see if I could find some advice and picked up a few hints to try. A quick trip to Joann’s the next day for some different needles and I was back at it…or so I thought. One of the recommendations was to use “sharp” needles. I remember one quote I read saying something like, “using a universal needle to quilt is like trying to push a baseball bat through the surface of your quilt.” Within a couple of stitches of using both a size 80 and 90 sharp needle I had two broken needles, and more growling from me!

The next thing I tried was a topstitch needle. That work a little bit better, but the thread was still shredding every so often. When I was at Joann’s I also found some small spools of Coats & Clarks variegated thread in colors that were close to the ones I was trying to use. The thread was a smaller weight than the YLI thread and I also decided to use the same thread for the bobbin to simplify the variables a bit. With the tension set to almost zero I was finally able to get the stitches to look the way I wanted them to on the top and the back. Some quilters do not think the Coats & Clark brand of thread is very high quality, but so far it has been my go to thread for free-motion quilting. From there it was smooth sailing! Finally!

The Free Motion Assistant is a pleasure to use once you get the thread tension set up. I was able to finish the quilting in a few short evenings after work. The most difficult part was quilting in the blue area since it is a dark fabric and I was using mostly dark thread I couldn’t always see where I had already quilted. Overall I didn’t quilt over my stitching more than a couple of places in that area and it is very difficult to find on the quilt top so I left them be. I could now tell my husband that quilting was a relaxing hobby when it all goes well 🙂 .

Autumn Leaves

To finish the quilt I decided to use the facing technique that I used on my Wind and Waves quilt because I didn’t want to add even a small border around the edge by adding a binding. I just love the way it makes the quilt look like a painting on canvas when hanging on the wall. After blocking the quilt we put it up in our family room over our new sectional. I am thrilled with the final product and how it looks on display. If I do say so myself, I think it is a stunning piece! I plan on showing it in the August show put on by Patricia’s Fabric House so if you are in the area stop by if you want to see it up close and personal.

Autumn Leaves in Family Room

Read Full Post »

I’ve wanted to post about some of the projects I have worked on that are complete for quite a while, so here goes!

Wind & Waves - Easy Waves Piecing Class Quilt

First up is the Easy Waves Piecing wall hanging I did for a class I took at Sew Creative in Fairport, NY. The class was taught by Pat Berardi a member of both the Genesee Valley Quilt Club and Perinton Quilt Guild (among others) that I too am a member of. The purpose of the class is to help you stretch your artistic quilting skills a bit by using the techniques described in Karen Eckmeier’s book “Layered Waves,” with one small adaptation Pat developed to make things even easier.

Wind & Waves Quilt - close up

As with all the classes I have taken so far, this was a fun group to work with. Pat did a great job of demonstrating the technique and offered guidance in picking out fabrics and arranging them for the finished product. I hadn’t put too much thought into what fabrics to use for this project since it was for a class. My thinking is to emphasize learning the technique and not to worry too much about making the perfect finished product. I picked out colors I liked that went well together. A couple of fat quarter packs that blended well together fit the bill. If I were to do it again I probably would have added some patterned fabrics to the composition. The quilt doesn’t fit in with my home décor so currently I have the quilt hanging in my office at work and have received many compliments on it. A couple of people thought it was a painting at first until I pointed out that it was made of cloth.

As an added bonus Pat also showed us a technique for finishing the quilt using a facing technique instead of the typical binding. I love how the piece turned out with a “borderless” finish and plan to use this technique on future wall hangings. I don’t have a picture of that because the facing blends so well with the backing you can’t see it.

Large Cherish Nature Pillows

The other project I worked on recently were the pillows for the sectional we ordered back in early March. The sectional finally arrived on June 25th and I finished the last two pillows that night. I completed the large pillows a few weeks ago and was very happy with how they turned out.

In late March I purchased a fat quarter bundle of Cherish Nature fabric designed by Deb Strain for Moda before I knew what I was going to do with it.  Who does that? 🙂  Shortly after I got the bundle I knew I would use the fabric for pillows and other things to accessorize the sectional with.   The color pallet is perfect to go with the dark brown leather of the sectional and the theme fits well with our home.

Small Cherish Nature Pillows

When I first received the fat quarter bundle I didn’t know what I would do with the three panels that came with it, but after discussion with my Chief Creative Consultant (CCC – my husband Charlie) I decided to use parts of the panels for the back of the pillows. I had three panels and 6 pillows to make and each panel contained one large and one small square that could be cut out to use for the backing. I added some borders and put a zipper in each one so I can change them up or wash them in the future. The way the panel squares worked out they made a great place to hide the zippers. I think they all look great on the new sectional and are also very comfortable and functional.

Large Pillow Backs

Small Pillow Backs

You can check out pictures of all the pillows on my flickr page.

The pillows look great on the sectional!

Next up is to put together a throw and wall hanging using the Cherish Nature fabric.

Read Full Post »

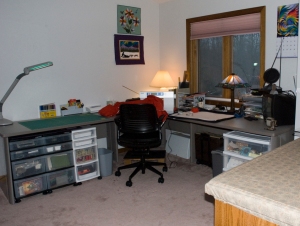
Sewing room you ask?  It used to be what we called the office, but since both Charlie and I have had laptops and no desktop computer in the house that room hasn’t been used for much.  Since I have had so much free time I have been filling my time with sewing projects.   As you may have read in my previous post I purchased a new sewing machine and needed someplace to put it.

View of sewing station from door

View of sewing station from door

We decided to position the sewing machine in the corner of the desk. This allows for a cutting station to my left and a quick pressing station to my right. The window allows for a great view of the back yard and beautiful natural light to work with during the day.  There is also plenty of room for a large project on the desktop.  This is a great set up that allows for an easy work flow.

In addition to the desk I have turned a glass bookcase into my fabric storage cabinet.  I have acquired quite a lot of fabric in just a short time.  I like it arranged by color although I have separated the batiks into their own color piles. The doors help keep the fabric dust free and I love looking at all the colors.

Sewing Room Facing Towards Door

Sewing Room Facing Towards Door

Charlie has been busy improving my room for me.  The only ironing board that I have is the one that is hanging on the door.  It is very flimsy and it’s difficult to get the door wedged so it doesn’t swing while you are ironing.  It is also a small ironing board that is okay when you are just pressing some small pieces, but when you get to a larger quilt top it is really limiting.  Charlie re-purposed a table top that he was going to make into a work bench for himself into a cabinet that I could use as a cutting table and ironing table.  He built and finished the cabinet and shelves so now in addition to having a nice large surface to iron on I also have more storage space.  It is great for things like batting and boxes for usable scraps.

Ironing Storage Cabinet

Ironing Storage Cabinet

I made the fabric cover with two layers of cotton batting in between two layers of fabric. There is a half inch thick piece of high density foam underneath and an elastic draw string secures it to the top.  The cabinet is also on casters so it can be rolled around the room if I need it to support a large project that I am working on.  Above the ironing table is my project board that Charlie made for me too.  It is just a few foam insulation boards glued together and held up with a simple cleat. This allows me to take it off the wall easily if necessary.

Big Leaf Quilt Top

Big Leaf Quilt Top

Right now I have my completed “Big Leaf” quilt top pinned to the design wall for display and so I don’t have to fold it up for storage.  I am so happy with how it turned out and I just love the colors in it.  The next step is to baste it with the batting and backing and quilt it.  Since I haven’t done any free-motion quilting before and that is what I want to do for this project I am practicing first.  The Big Leaf quilt is too beautiful to mess up with bad quilting.

Free Motion Quilting Sampler in Progress

Free Motion Quilting Sampler in Progress

Last weekend I took a class in free motion quilting at Sew Creative in Fairport where I purchased my sewing machine. The most important thing the instructor, Diane told us to improve our work was to practice, practice, practice and that is just what I am doing.  The above piece I am working on is just a simple fabric sandwich that I divided into squares and rectangles.  In some of the blocks I traced some continuous line designs and other blocks are blank to fill in later with more improvisational type of quilting.

My plan is to fill the blank blocks with designs from the Day Style Designs blog – 365 Days of Free Motion Quilting Filler Designs Project.  This site has great tutorials on how to do over 100 designs so far and her goal is to do a total of 365!  She has them labeled by level of difficulty so I will start with the beginner level first and work my way up.  If you click on the image above it will biggify and you can see some of the designs I have done so far. My plan is to fill all the blocks so I better stop writing and continue quilting.

Read Full Post »

It’s been a while since I posted last so I thought I would let you know what I have been up to.  In September I was let go from my job at Lollypop Farm, a position I held for almost 12 years.  I had already been looking for another job as working with the current managers was becoming more painful for me every day.  You know it is time to move on when the only reason to get up and go to work is to tend to, and spend time with, the cat living in your office.  Unfortunately my departure did not go as I had planned, but happened before I was able to find a new job.  The only thing I miss about my job at Lollypop Farm are the true friends I had there and getting to have a cat living in my office.  I miss my kitty cuddles.

I have not been sitting idly by since my departure from regular work.  Of course I have been hunting for a new job and have had a few interviews.  As you all know, there are just so many applicants for each position it is difficult to land that job.  I am confident that I will be the lucky one someday, but Charlie (who is also newly unemployed) and I are financially okay for the time being.

A pair of BFF Handbags

Horse-themed BFF Handbags

Most of my leisure time has been spent behind my sewing machine.  I started by making a nifty handbag, called a BFF handbag, and a matching clutch for my friend Nicole’s birthday.  I have since made about half a dozen of these in various combination’s of fabric.  One of them I donated to Birdsall Horse Rescue and Sanctuary, a new non-profit horse rescue, for their first major fundraiser.  I found a great set of horse related prints in a fat-quarter bundle and was able to make two bags.  I let my friend Maggie pick one of the horse themed bags for herself and the other one went to the rescue group.  Another one with a bird theme was a Christmas gift to Karen, a bird loving friend.

It’s a lot of fun to decide what colors and patterns of fabric to mix together for each creation.  I have also made a purse and clutch for myself, but more on that in another post.

Pfaff expression sewing machines

Pfaff Expression sewing machines

In November I purchased a new Pfaff Expression 2.0 sewing machine after carefully researching features and price.  The Bernina that I had been working on is 35 years old and was in need of a tune up.  I am considering attempting to sell some handbags on etsy.com and felt I needed a more adequate machine for that task.  Bernina makes a great machine, but I felt I got more of the features I wanted and a wider sewing bed for a great price (it was on sale, of course) with the Pfaff.  The Bernina has been tuned up and is working great too.

For Christmas my mother gave me a membership to the Genesee Valley Quilt Club that she has been a member of since she retired.  The meetings are during the day so if you work for a living it can be difficult to attend.  I went to my first meeting in January and enjoyed meeting many talented women for whom quilting and fiber arts is a passion.  In addition to making the handbags I also managed to make a small quilt to add to our Christmas decorations and enjoyed the challenge.

Since then I signed up for a class at Patricias’ Fabric House in East Rochester to learn how to create art quilts using a freezer paper piecing technique.  The class is taught by Pat Pauly, an accomplished creator of art quilts.  We are creating a single square from what Pat calls her “Big Leaf” quilt.  You can see a sample of that work on the DeCampStudio blog.  I would include the picture here, but it is copyrighted so I will provide the link.  Be sure to click on the image of the quilt to see a large version.

Cindy's Big Leaf - a work in progress

Cindy's Big Leaf - a work in progress

The first class was on Thursday, January 21st.  During class we learned the techniques we would need to cut out our pieces of fabric and sew them together.  We spent much of the free time in class going through the fabrics we brought with us trying to decide which fabrics to use in which parts.  I completed the decision making process the next day at home.  Above is the leaf pinned up to my project board before sewing.  It took a bit of work to decide which fabrics to use for each piece, but I am very pleased with the results.  My Chief Creative Consultant, Charlie, helped choose the fabrics too.  I was going for a more Fall-like look to my leaf and decided on the blues and greens for the back ground colors to represent the sky and grass.

Completed Big Leaf

Completed Big Leaf - all sewn together

Sewing the skinny vein up the middle of the leaf was the most challenging task, but thanks to my years of sewing experience I was able to complete it.  Now I only have to cut out 3 more sets and sew them all together!  After that I will put them together to form a larger square and then machine quilt the top.  Stay tuned……

Read Full Post »